Yogic breathing: chest to belly or belly to chest, and why do we care?

There is an ongoing discussion in the yoga community about the directionality of the breath – do you begin your inhalation in the chest and then fill the belly or do your fill up the belly first and then expand the chest? This seemingly innocent question can have yoga teachers argue till they are blue in the face. Is there a right answer? Yep, but before we get to it, let’s start at the beginning.

First of all, let’s get our facts straight – we CANNOT breathe into our bellies (if the air does go into your belly, you are in deep trouble). You certainly do and should EXPAND your belly as you breathe in, but not because the air goes there.

To understand the intricate process of respiration, we need to know two important facts.

FACT 1: Air will flow from an area of higher pressure to the area of lower pressure

FACT 2: Lungs DO NOT have muscular tissue, which means that you cannot move your lungs at will. Instead the outer surface of the lungs sticks to the inner surface of the ribcage and to the top of the diaphragm; as a result, lungs get pulled following the movement of those structures. So you cannot move your lungs directly, but you COULD intentionally expand the ribcage and, to some degree, affect the movement of the diaphragm (because it is a muscle), which would move your lungs indirectly.

Technically here is what happens when we breathe:

Breathing

When the air rushes into the lungs, they get filled all at once – you CANNOT fill the bottom of the lungs first and then the top. Oxygen is not liquid, it’s gas; therefore you cannot fill a container (lungs) from the bottom up, like you would with liquid.

HowTheLungsMove

The degree of movement of the diaphragm and the ribcage can vary.

  • During diaphragmatic or deep breathing we rely mostly on the movement of the diaphragm; it usually occurs at minimal levels of activity.
  • During costal, or shallow breathing we rely mostly on the rib cage changing it’s shape and is more common during higher activity levels OR when the contents of the abdominal cavity restricts the movement of the diaphragm (for example, when there is a baby there).
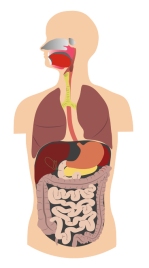
WebAs you can see from this image, your abdominal cavity is packed with stuff – vital organs, digestive tract, etc. When the diaphragm moves down on the inhalation, it pushes down on your abdominal content and it has no other place to go but forward, so your belly pushes forward.

So far we have described the natural pattern of breath: when you breathe in, your chest and your belly both expand AT THE SAME TIME; when you breathe out, both of them return back to the original shape. Now, we CAN use muscular control to change that pattern, consciously or unconsciously. One of the examples of unconscious muscular interference is an unfortunate pattern of “reverse breathing”, when we pull the belly in on the inhale, instead of pushing it out. So if you are keeping your abdomen taut on the inhalation, you are preventing your abdominal contents from moving forward, which means that it will stay where it is and restrict the movement of the diaphragm. So you will end up relying on your rib cage instead; if you do it consistently over time your diaphragm might loose some of it’s elasticity causing shorter and shallower breathing (and who wants that (?!)

When we decide to change the natural pattern consciously, we might CHOOSE to expand the belly first and then expand the chest or we might CHOOSE to expand the chest first and then expand the belly. Both are voluntary actions done for a number of reasons:

BellyBreathingInhale – Expand the belly first then the chest

  • To emphasize the movement of the diaphragm
  • To try to overcome “reverse breathing” pattern
  • To produce a grounding effect on the system
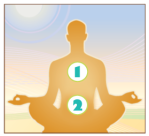
ChestBreathingInhale – Expand the chest first then the belly

  • To lengthen the spine and improve posture
  • To gradually deepen the breath
  • To have a more uplifting effect on the system

Your exhalation can either be passive or active. With passive exhalation, the muscles that’s been contracting on the Inhale relax and return to their original position.  With active exhalation you use your abdominal muscles to compress the abdomen and force the diaphragm upward. If you do your abdominal contraction in a gradual fashion as you exhale, it will help stabilize and support your lower back (read more about the progressive abdominal contraction).

And of course, yogis were very interested in the energetic effects of the breath. Breath is a vehicle for prana, the vital force, that runs in different currents throughout the body.  According to Bhagavad Gita, every breath cycle is an opportunity to link prana and apana – two primary currents of the life force.
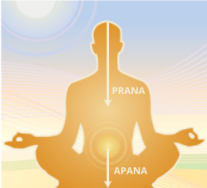
PranaApanaMovementApana, which is aligned with the force of gravity, moves downward resulting in elimination of wastes, as well as disease, aging, death and the diminution of consciousness. Prana, which is aligned with the air and space elements is meant to move downward and is responsible for everything we take into the body – food, water, experiences and information. But it can disperse upward through the mind and senses, especially in this age of sensory and information overload.  This leads to loss of mind-body coordination and devitalization. Uniting these two primary vayus results in strengthening our energy along with awakening our higher faculties. Yogic practices work to raise apana up to unite with prana and draw prana down to unite with apana, which occurs in the region of the navel – the pranic center in the body.
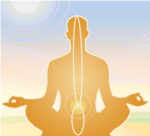
PranaApanaTo unite prana and apana, we would focus on the SYMBOLIC downward movement of the breath on the inhalation (nose – throat – expand the chest – expand the belly) and SYMBOLIC upward movement of the breath on the exhalation (progressive abdominal contraction from the pubic bone toward the navel and then deflating the chest).

So to go back to our original question – which breathing pattern is right – chest to belly or belly to chest – the answer is: It depends! It depends on what you are trying to accomplish.

Too many asymmetrical poses can create sacroiliac joint issues

I must admit: before I started my viniyoga teacher training, I’ve never heard of sacrum issues. Sure, I knew what sacrum was, but my first teacher training program never talked about it, my students never complained about it, I haven’t had any trouble myself. So I’ve moved through life blissfully unaware, until I started my viniyoga teacher training.  Then all of the sudden sacrum became front and center. I would hear “this pose can be problematic if you have sacrum issues”, “do this to take care of your sacrum”, “make sure you don’t feel any discomfort in your sacrum”, etc. You know how when you decide to buy a certain car you start seeing it everywhere? Same happened for me with sacrum. All of the sudden I’ve discovered that sacrum issues are everywhere and yoga practice often creates or contributes to the problem.

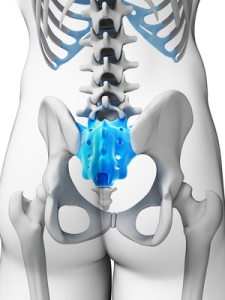
3d rendered illustration - sacrumWell, to be more specific, it’s not really the sacrum that we have issues with, but the sacroiliac (SI) joints. Quick anatomy reminder: sacrum is located at the base of your spine and consists of 5 vertebrae that are fused together to form a bone about the size of your hand. It fits snuggly between the two sides of your pelvis and is connected to them via the sacroiliac joints. SI joints are weight bearing because the sacrum bears the weight of the spine and transfers it through those joints to the pelvis and then down into the legs. Like any weight bearing joint, it needs to be stable, so there are several ligaments that bind the sacrum to the pelvis to restrict it’s movement.

Now some of us have more mobility in the sacrum then others and that’s what can create potential problems. The sacrum has an ability to tip slightly forward in relation to pelvis (called nutation) or slightly back (counternutation). It can tip 5-10% at most, but even that can create the sense of instability in the pelvic area.

SacrumNutation

Who is at risk? Anybody can suffer an SI injury but the following populations are at a much greater risk:

  1. Women of reproductive age. Theoretically, the movement of the sacrum is designed to accommodate the passing of the baby through the pevis: first counternutation for the head to enter the pelvis and then nutation to get the tailbone out of the way. And we all know that in pregnant women hormone relaxin is released, which makes ligaments more lax for the same purpose of accommodating the birthing process. So whether or not your students are pregnant right now, if they are of reproductive age or gave birth before, they are more likely to have more mobility in their SI ligaments.
  2. Ligamentous folks. Some of us were born with looser ligaments, which enables us to do more advanced yoga poses, but also puts us at risk for SI issues because of extra sacrum mobility.

 The problem. So that young uber-flexible girl in your class, who is happily trying to stick her foot behind her head runs the risk of pulling or injuring her SI ligaments. Her sacrum is more likely to pop out of place, usually on one side, and once it’s out of place it will pull on the ligaments that are supposed to keep it in place, causing sharp obnoxious pain on one side of her lower spine. And as we know, ligaments are highly avascular, which means that if there is a tear in a ligament, it will take a long time to heal because of poor circulation to the area. Unfortunately, once you injure the area, you are likely to reinjure it again, especially if you maintain an advanced yoga practice and ignore your body’s pain signals. We say that a student has a “hot sacrum” if her SI joints are sensitive and prone to injury. Folks like that will have to modify their yoga practice dramatically while they are in the healing stage, otherwise they will keep reinjuring it and turn it into a chronic problem.

Now what can we, as teachers, do to minimize the risk of the sacroilliac injury?

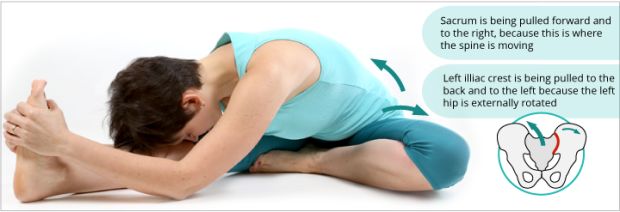
1. Approach advanced assymetrical poses with great care, especially the ones where one hip is in a fixed position and the spine is being strongly pulled the other way. Look at Janu Sirsasana, which is not necessarily an advanced posture but it typically aggravates “hot sacrums”.

JanuSirsasanaSacrum

It is wise to take the following precautions for any advanced asymmetrical posture:

  • Do not use arm leverage to pull yourself into the pose if you sense resistance in your SI joints.
  • Make sure that the students’ bodies are adequately prepared before they attempt a posture (read more on how to prepare the body for a difficult posture)
  • Please, please, please DO NOT demonstrate advanced poses if you are not warmed up appropriately yourself. This is a major source of injuries for yoga teachers.
  • Remind your students (and yourself) to stop if it hurts.

2. Do not teach too many asymmetrical poses on one side, it can lead to cumulative stress on the SI joint. I was recently in a class where the teacher did the following poses:

UnfortunateSequence

This entire sequence was done on one side first, holding each pose for 4-6 breaths, without any queuing about changing the position of the feet or using abdominal contraction for support.  Do you see a problem here? The position of your left leg is fixed, which means that the left side of the pelvis will be anchored in mostly forward-facing position. Water Bottle TopThen you move your spine through a side bend, forward bend, back bend, side bend and then twist. Your sacrum follows the movement of your spine, tugging and twisting and torquing your left SI joint. This reminds me of trying to pull off the top of a plastic bottle – to break the thin piece of plastic you would bend it forward, bend it back, twist it one way, then the other and hopefully it will come loose after that. Why would you want to do that to your SI ligaments? They won’t break off, of course, but they will get destabilized and become more vulnerable and susceptible to injury.

Solution: Switch sides more often and alternate asymmetrical poses with symmetrical forward bends.

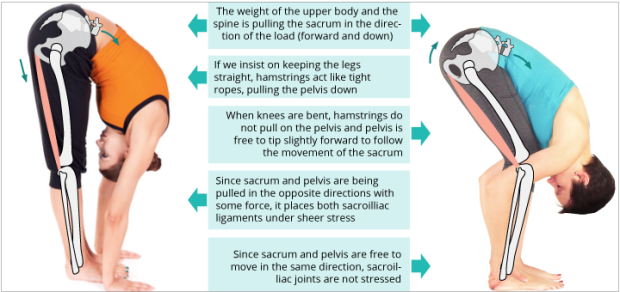
3. Do not insist on keeping the legs straight in forward bends; it creates sheer stress on the sacrum.

SacrumForwardBend

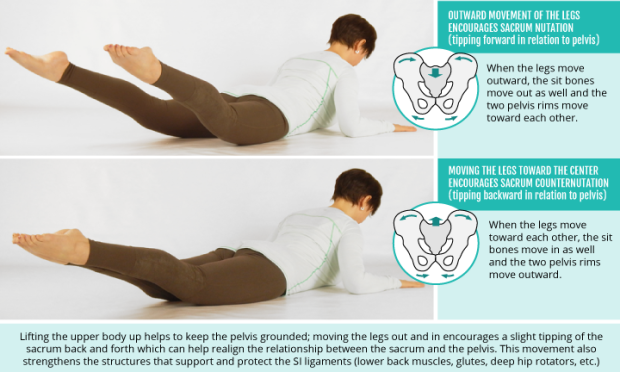
4. When you sequence your classes, be sure to include poses that stabilize the sacrum. In the traditional approach to sequencing summarized by Sri Krishnamacharya, prone back bends always follow the standing postures to make sure that whatever you have done to your lower back/sacrum area in standing could be neutralized via symmetrical prone poses.

Vimanasana is one of those “magic” yoga poses that does it really well. However, you need to make sure that

A. Your student’s back is strong enough to handle it
B. Your student keeps her pelvis grounded on both sides when she attempts it.

Vimanasana

These are some simple basic ideas that are not hard to implement, but they will help protect your students’ SI joints. If your student does get injured, in the class or elsewhere, it is best to limit or eliminate the activities that irritate the area, including one’s yoga practice. Once the acute stage has passed, she can seek guidance from a physical therapist or a qualified yoga therapist on how to stabilize and strengthen the sacrum area before returning to a regular yoga practice.

Have you ever had trouble with SI joints? If so, what did you find helpful?

Additional resources on the subject:

Anatomy of Hatha Yoga: A manual for Students, Teachers and Practitioners by D. Coulter
The Female Pelvis Anatomy and Exercises
by B. Calais-Germain
Protect the Sacroiliac Joints by R. Cole

__________________________________________________________________________

Enter your email address to subscribe to this blog and receive notifications of new posts by email.

How to create a yoga practice to prepare for a difficult posture

GoalPosturePracticeNot long ago an acquaintance of mine said to me: “I saw a picture of this cool pose on line and I tried it – man, my back hurt afterwards!” Turns out he’d attempted Dhanurasana without any sort of preparation – bad idea.

Any complex/intricate yoga pose requires specific preparation and it doesn’t mean couple rounds of Sun Salutations. As yoga teachers we have the responsibility to both analyze the biomechanics of movement in any difficult posture and try to foresee potential risks that it has for the body. Then we need to prepare our students FOR THAT PARTICULAR POSE and do our best to minimize the risk.

When it comes to deciding on how many difficult postures to include in a practice, there are few factors to consider:

  • student’s abilities (students who are younger and more physically able can handle multiple goal postures)
  • intended length of the practice (if you want your practice to be short and specific you have to stay focused on one thing)
  • the difficulty of the posture itself (some poses are riskier then others)
  • the purpose of your practice (a teacher might spend an entire class preparing for Tree pose to explore the idea of grounding)
  • teacher’s experience (it’s harder to design safer practices for multiple goal postures)

Generally speaking, less is more. If you pick one goal posture per class, you will be able to prepare adequately, explore it properly and then compensate appropriately. If we think of a yoga practice as a bell curve, the goal posture would be at the very top, the pinnacle of the practice. It also makes more sense to sharpen your skills by building a practice around one goal posture, before you move on to multiple options.

GoalPosturePracticeInfographic

Stay tuned for breath-centered, population-specific and integrative practices!

__________________________________________________________________________

Enter your email address to subscribe to this blog and receive notifications of new posts by email.

How to prepare for shoveling snow using simple yoga stretches

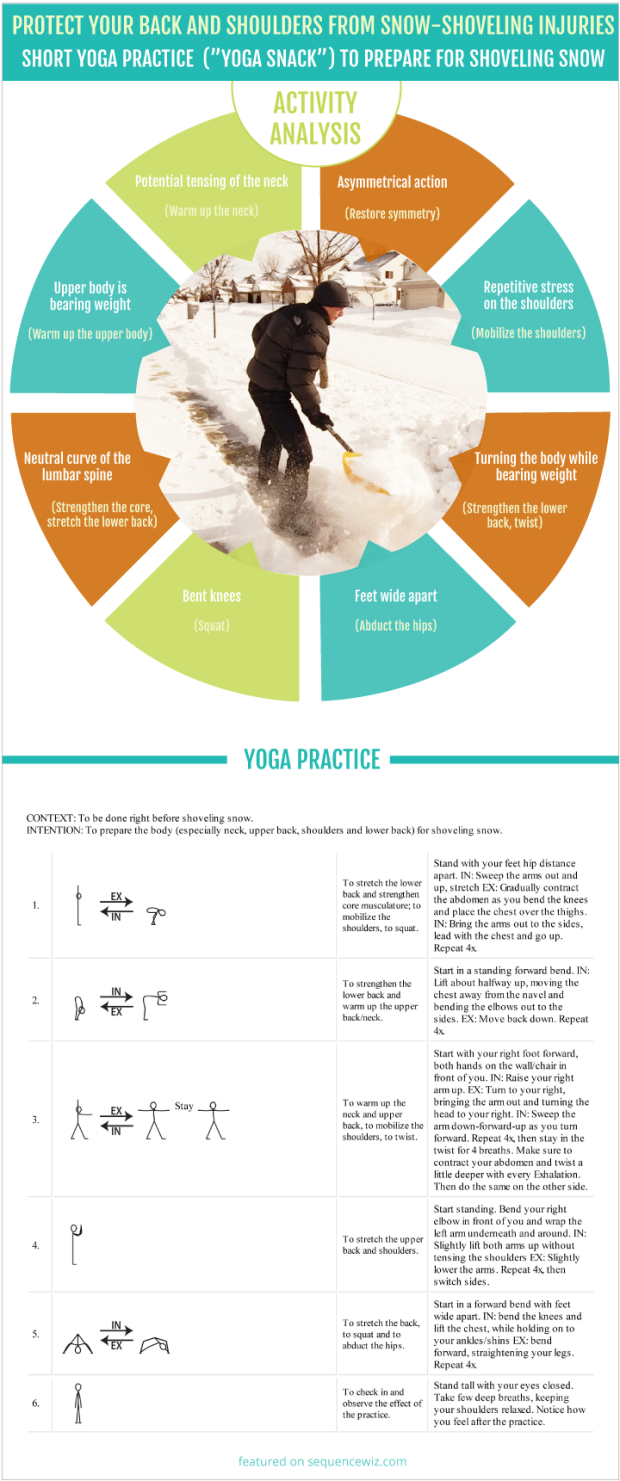
Did you know that shoveling snow sends about 11,000 adults and children to the hospital EACH YEAR?!  (Read about the study) The most common injuries are overworked muscles and falling, in addition to muscle, ligament, tendon, and other soft tissue injuries. Don’t let your students become the next snow-shoveling casualty! This simple yoga practice will help minimize the risk of muscle strain and other injuries and prepare the body areas used while shoveling snow. Show Shoveling Yoga Practice Here is a video of this practice:

Yoga stretches to prepare for snow shoveling

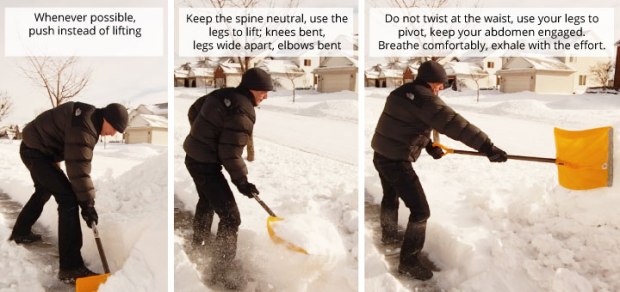
To make it less stressful for the body, it’s important to pay attention to the technique: ShovelingTechnique

Here are some other tips on how to minimize the risk of injury from American Academy of Orthopedic Surgeons.

Subscribe to this blog to receive other “yoga snacks”(short yoga practices): YS for long office hours, YS for the upper back tension, YS for tight calves, YS to prevent common cold, etc.

__________________________________________________________________________

Enter your email address to subscribe to this blog and receive notifications of new posts by email.


How to design a yoga practice for a specific activity

That is a funny thing about a yoga practice – it doesn’t work if you don’t do it. 🙂 Yes, we are all busy and making time for a 90-minute class (plus all the driving-parking-changing-etc. time) is not easy for many students. But almost anybody can do a little something at home. That’s why we always encourage our students to practice on their own.

Of course, we can’t MAKE anybody do yoga. But what we CAN do is break it down into manageable pieces and make it relevant to our students. Let’s say your student likes to play golf – excellent! Doing a little yoga before the game will loosen him up, prevent potential injury and may even improve his swing. Or let’s say your student spends a lot of time in front of the computer (who doesn’t ?). We all know how the neck and back get stiff, breathing gets shallow, attention starts to drift after staring at the screen for some time. But if she does a short yoga practice right there in front of her desk, it will release tension, improve energy and refocus her mind.

Yoga Practices for Activities

Convincing a student to do some yoga before or after an activity that they are already doing is much easier then to begin a general home practice. Once you get their attention and begin to design a practice for them, it’s easy to fall into a trap of too much. Yes, we know a lot, and yes, we want to maximize the benefit for the student, but let me ask you – is she more likely to do a practice that’s 7 minutes long or the one that’s 40 minutes long? Exactly. It doesn’t matter if the practice you design for your student is absolutely fantastic, if she doesn’t do it, she won’t get any benefit.

It needs to be short enough not to be threatening, yet long enough to make a difference. We call those practices “yoga snacks” because they are short, to the point and easy to do in the course of the day, anywhere you are. Here is how you do it (click on the image to see full details).

Infographic: Home yoga practice for an activity In the next post we will illustrate how to use those guidelines to create a short preparatory practice for shoveling snow (for all those dealing with blizzards!) In the one after that we will design a short stretch break at the desk. Stay tuned for “yoga snacks” for long car rides, air travel, skiing, hiking, gardening and more! You can also request a practice for a specific activity that you like to do, just mention it in the comments below!

__________________________________________________________________________

Enter your email address to subscribe to this blog and receive notifications of new posts by email.

10 types of yoga practices to maximize the effect for specific students

There are many ideas out there about what a yoga practice should look like: some believe that it’s only valid if it has a spiritual component; others focus on strictly physical benefits. I have my ideas, too. I believe that an appropriate yoga practice can facilitate change on any level – physical, physiological, spiritual, but it doesn’t mean that every practice should have all those elements present. Sometimes it IS just about the body. Other times it IS all about connecting to something greater.

Types Of Yoga Practices

Every yoga practice must be purposeful. Here are some common types of practices based on the things that we want to accomplish:

10 Types Of Practices Infographic

Over the next few months we will explore those types of practices one by one, highlighting the most effective ways of accomplishing our goals.

For each type we will discuss the following ideas:

  • Who is it for
  • When to do it
  • How to structure
  • Which elements to choose
  • How to assess effectiveness

Subscribe to this blog (below) if you want those posts delivered straight to your mailbox!

__________________________________________________________________________

Enter your email address to subscribe to this blog and receive notifications of new posts by email.

Yoga for stress relief – is relaxation really the answer?

Stress Relax In the recent years yoga has become a go-to tool for stress management and very often it’s being presented as “Yoga for relaxation and stress management” with an assumption that those two are similar, if not the same. But if you look closely at the actual physiological reaction that takes place in the body in response to stress, it becomes clear that relaxation is NOT the first order of business when it comes to stress management.  What is it then? Let’s take a look.

Let’s ask ourselves first – what is stress? This is how MedicineNet.com describes it: “Stress is simply a fact of nature – forces from the inside or outside world affecting the individual. Because of the overabundance of stress in our modern lives, we usually think of stress as a negative experience, but from a biological point of view, stress can be a neutral, negative, or positive experience.”

In other words, it’s impossible to have stress-free life, because stress is ANY change that happens within us or in our environment.  Now the bigger question is how we deal with it. Nature has equipped us with a handy mechanism that is designed to regulate our stress response: autonomic nervous system. ANS regulates individual organ function and homeostasis (state of internal balance). For the most part, it is not subject to voluntary control. ANS consists of 2 distinctive parts: Sympathetic (Fight or Flight) and Parasympathetic (Rest and Digest) systems. They work in opposition – whenever one is being activated, another one is being suppressed.

stress level conceptual meter indicating maximumI like to think of the SNS as the accelerator and the PNS as the brake. Just like the accelerator in your car, you need the sympathetic response to get you anywhere in life, it’s the driving force. And, of course, you need brakes to slow down and stop when necessary. Now the trouble begins if you get stuck in the acceleration mode – you can drive yourself into a wall, run out of gas and in general it is not sustainable for a long period of time because it puts incredible wear and tear on your system. It seems simple – well, just STOP when you need to! It’s not so easy. And when we suggest “relaxation techniques” for stress management, this is exactly what we are asking to do – to flip the switch from sympathetic to parasympathetic in an instant.

Imagine this hypothetical scenario: you are driving down a dark country road and suddenly see a dear in front you. That’s quite the stressor! Let’s say you managed to maneuver around it and keep driving, left with all the signs of SNS activation: fast shallow breathing, sweaty hands, pounding heart, overall sense of panic. And your passenger says: “Oh, just stop it. Get over it.” Could you? Probably not. But there is something you COULD DO to begin the process. What is it?

Let me give you a hint. A recent study analyzed the occurrence of PTSD in 911 witnesses and found that it was much lower in the group of people who ran after they have witnessed the attack. Why? Because they MOVED!

After encountering a stressor the body is flushed with adrenalin (to set stress response into action); energy is being pulled away from the “maintenance” bodily functions and directed toward large skeletal muscles (so that you could fight or run away).

But you are still stuck in your car after your dear encounter with no room to move. If you do not have an opportunity to release the built-up energy through movement, it will be much harder for you to return to the state of balance. Repressed physical/emotional response to stressors significantly exaggerates the physiological response.

Yoga-for-Stress-ReliefSo what would be a better solution to our imaginary scenario? To stop at the nearest rest stop and run around your car, do some jumping jacks – whatever. MOVEMENT is the answer. And ideally the intensity of movement should correlate with the intensity of the stress response.

That’s how it works in the animal kingdom. Zebras don’t get stressed, for example, even though their lives are often at risk from the predators. When the zebra outruns the lion, it can calmly resume it’s usual activities without exhibiting any signs of stress. It’s because the adrenalin and other hormones have been reabsorbed into the system, the process facilitated by galloping away. And that’s why exercise works so well for humans in stress management, and needs to be done consistently and preferably soon after the intense stress response. To read more about stress and how it effects our bodies on different levels, check out a wonderful book by Robert Sapolsky Why Zebras Don’t Get Ulcers.

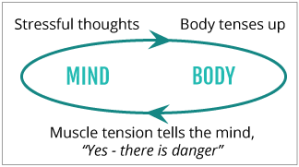
Another benefit of movement, and especially yoga movement, is that it gives you a chance to get out of the “Stress loop”. Stress loop If you relieve the physical tension that accumulates in your body in response to your stressful thoughts, your body will stop sending alarm messages to your brain that something is wrong. It helps if you target the areas that tense up the most due to stress, like neck, shoulders and upper back.

So if you teach a yoga class and stress relief is on the agenda, it would be more effective to start with some fast movements that involve large muscles groups and then gradually slow down the pace, deepen the breath, bring the students closer to the ground. It makes more sense then starting with seated postures and breath work, for example. We want to meet our students where they are (fatigued yet jittery after long stressful day) and take them where they want to go (more calm, stable and balanced).

_________________________________________________________________________

Below is a sample home yoga practice that you can do whenever you are feeling stressed out. It includes simple movement, breath awareness and a short meditation.

STRESS RELIEF HOME YOGA PRACTICE (PDF)

You can copy this practice, change it to your liking and use it as template by logging in to your Sequence Wiz account.

How to sequence a class for the Shoulderstand (5 steps)

Leslie Kaminoff brings up an excellent point in his video: in a yoga practice sequencing is not the same as choreography. In choreography the goal is artistic expression and choices are dictated by elegance and aesthetic appeal. Of course, it’s nice when a yoga class flows gracefully, but that is not he main goal. We do not practice yoga to look pretty while we are at it, but to get some benefit, whether it’s physical, physiological of psycho-emotional. The way we arrange poses and other elements in a yoga practice is determined by what we want to accomplish and how we can get there effectively with minimum risk to the body.

Let’s use the Sarvangasana (Shoulderstand) to illustrate the process of class planning for maximum benefit and minimum risk. We’ll call it a 5-step sequence planner (it’s applicable to any other posture).

Step 1: Pose analysis

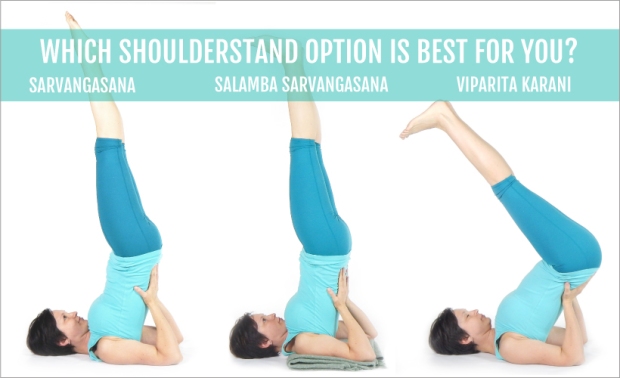
Shoulderstand is a risky posture because your neck is placed in a vulnerable position. It can strain the muscles, ligaments and nerves of the neck. To minimize the risk for you neck, you might choose to place a blanket under the upper back (as in Salamba Sarvangasana) or shift the weight from the neck more toward the upper back (as in Viparita Karani).

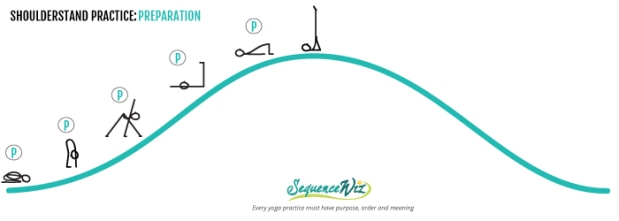
Shoulderstand Options Whichever option you choose, it’s not safe to start with it and it is not safe to put it at the very end of the practice. To do Shoulderstand safely, you need to have strong upper back and lower back muscles, as well as core musculature. Traditional presentation of a yoga practice involving inversions (outlined by Sri Krishnamacharya) looks like a bell curve with Shoulderstand at the top. We do other poses to both prepare the neck and upper back for the load that they are about to bear and compensate for it. Shoulderstand-curveBCHow to prepare the body for Shoulderstand

Step 2: Preparation

It might take some time to develop the strength of the upper back, lower back and core musculature (not within a space of one class). We call it “long-term preparation” and it involves using other, less risky poses to strengthen the target areas.

“Short-term preparation” describes the choices you make within the space of one class leading up to the Shoulderstand. The minimum preparation that we have to do before attempting this pose includes:

  • Forward bends to stretch the lower back
  • Twists or lateral bends to warm up neck, shoulders and upper back
  • Some “legs up” pose to introduce the inversion effect
  • Bridge pose to stretch the upper back and neck right before the Shoulderstand

Contrary to popular belief, Halasana (Plow pose) is NOT a good preparation for Shoulderstand because it puts the neck and spinal extensors into a MORE strenuous position.

Shoulderstand-curvePreparation __________________________________________________________________________

Step 3: Assessment

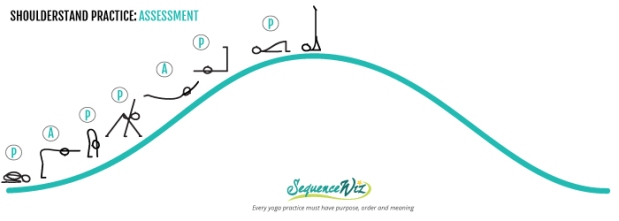
It is important to include poses that will demonstrate whether or not the student is ready to do Shoulderstand on that particular day. We use Ardha Uttanasana and Salabhasana to access the strength of the neck, upper back and lower back. The student should be able to hold each one of them in good form for at least three breaths. If it’s not possible, Shoulderstand is not recommended.

Shoulderstand-curveAsessment __________________________________________________________________________

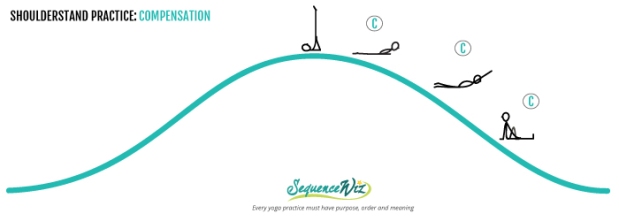
Step 4: Compensation

Compensation basically means taking steps to help the body return back to a neutral state. If you bend deeply one way, afterwards bend the other way to balance it out. A common compensation pose for Shoulderstand is Matsyasana (Fish pose), but it isn’t the best choice. Yes, Fish pose places the neck and upper back in the opposite position from the Shoulderstand. The problem is that you lock your upper body in place, and the muscles at the back of the neck stay passive. A better option is to MOVE the body in the opposite direction (instead of locking it there) to restore the contractile power of the muscles that were intensely stretched in Shoulderstand. In other words, we need to actively engage posterior neck muscles and upper back to increase blood flow to the area and do it in a way that is not as stressful and passive as Fish pose. Bhujangasana (Cobra pose) is an excellent choice. But Cobra pose is not enough; we also need to mobilize the arms that were locked in Shoulderstand with some arm-sweeping motion, and to rebalance the relationship between the neck, shoulders and upper back with some simple twist.

Shoulderstand-curveCompansation __________________________________________________________________________

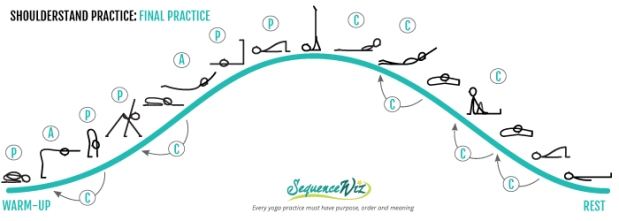
Step 5: Reevaluation.

Once we look at the poses we’ve selected so far, we will notice that we need to include some other compensatory poses to neutralize the effect of the more difficult postures. For example, we usually put some sort of a forward bend after a deep back bend or a twist. In addition, we might need a bit more warming up before we attempt poses like Ardha Uttansana; and will also include Savasana at the end to rest and integrate.

Shoulderstand-curveFinalPractice

And there you have it. This is a basic outline of the Shoulderstand practice with adequate preparation, compensation and no random elements. Theoretically, this kind of thinking should go into the design of every yoga practice. Of course, even with all those elements in place, Shoulderstand is still not safe for everyone. Some contraindications include disc problems, high blood pressure, glaucoma, sinus blockage, obesity and general weakness in the upper back/shoulders/neck. Read more about risks and benefits

If you choose to teach and practice Shouldetstand, please be mindful of those risks and take care of yourself and your students!

__________________________________________________________________________

Video of the Shoulderstand practice

Video of the Shoulderstand practice

The following practice includes all the elements described above plus a one-legged adaptation of the Shoulderstand (Ekapada Sarvangasana). Integrating this pose into the practice requires some additional preparation.

COMPLETE SHOULDERSTAND PRACTICE (PDF)

__________________________________________________________________________

Enter your email address to subscribe to this blog and receive notifications of new posts by email.

9 phrases to purge from your yoga instruction

Yoga-Teaching-LanguageOne of my friends had recently reported on her experience in a yoga class: “The teacher was really nice, but she kept calling us “folks” literally in every sentence and sometimes twice in one sentence. It was really distracting.” Oh the speech clutter… I remember in my yoga teacher training we were asked to record ourselves teach and then analyze the recording – a very useful exercise. I was horrified when I heard myself on tape – I had no idea it sounded that way. For the past 10 years I’ve been working on making my teaching language more clear, concise and less cluttered; and helping my teacher trainees do the same.

Here is the list of the most common “language offenders” that I come across:

1. “Words-parasites” (an actual linguistic term in Russian language) – “like”, “”folks”, “something like that”, etc. Those words/phrases do not serve any purpose and are unnecessary in a yoga class. You may end up sounding like a stereotypical chatty teenage girl, not the experienced professional that you are. I often find that teachers use those words to fill up space while they are thinking about what comes next; if that’s the case, there is no need to say anything. Or sometimes it’s just a habit that needs to be overcome.

2. “I want you to …” is quite common in yoga classes. Using it makes an impression as if the practice is about you, the teacher, not about your student. It’s as if they are doing it for you. Our goal is to empower our students and give them the sense of ownership of their practice, not take it away.

3. “Breathe into your right big toe” – we often ask our students to “breathe into” body parts where physiologically breath has no business going. If by that you mean “bring your attention to your right big toe”, say that. If you mean “AS IF you are breathing into your right big toe”, say that. Keeping your instructions clear will help avoid your students thinking “Ha?”

4. “Expand your thighbones like rainbows radiating outwards” and other flowery language. There is time and place for that, for example during meditation or relaxation, if that’s your style. When you instruct movement, it’s best to be more precise. What are you asking them to do exactly? Then the students are clear about what’s expected of them. In my experience many students perceive this kind of language as “fluff” and tolerate it as necessary evil. And that is not the response we are after.

5. “Allow” is a very common word one hears in a yoga class. It always makes me wonder – who is in charge? Who is doing this practice? You do not technically “allow your arm to lift” – it will not do it on it’s own, you have to do it. Action words like “lift, raise, put, etc.” make your students feel capable and in charge, while “allow” creates an impression of being pulled by some mysterious force. There is a place for “allow”, of course. For example in Savasana it is perfectly appropriate to say “Allow your belly to expand naturally on the inhalation” because here you are letting go of the effort and allowing things to happen on their own.

6. “Let’s just …” When you say that, it sounds as if you are apologizing or pleading with your students. In a yoga class you are the figure of authority and you need to project confidence, otherwise your students will doubt your competence. It is similar to saying to my toddler: “Let’s just wash your hands before dinner if you don’t mind”. Don’t plead. Tell them directly what you expect them to do.

7. Saying “piriformis” and pointing to quadratus lumborum. Name the muscles only if you are confident in your knowledge. If you are not clear yourself, don’t say anything. We do not want to spread misinformation and you never know who is in your class today – a doctor, a massage therapist, another yoga teacher – they will catch incorrect information immediately. I have a student who refers to any part of her hip as a “hip flexor”. It’s an ongoing joke between the two of us, but it wouldn’t be funny if it was coming from a yoga teacher.

8. Yoga voice. At the beginning of my teaching career I remember myself adopting a “teaching voice” – slightly higher pitched, different modulation, flowing more like a song. When I heard myself on tape I realized that it sounded completely fake. This is what I thought a yoga teacher should sound like. Be yourself. Talk how you normally talk. You don’t need to assume a different persona when you teach, it’s best to be authentic in your instructions and your presentation.

9.  Talking your student’s ear off. As yoga teachers we’ve learned a lot and we want to share our knowledge, experience and suggestions. It’s all understandable. Often it turns out to be too much. Use of language in teaching yogaIf a teacher talks non-stop during class, where is the space for a student to connect to her own experience? The student will either feel overwhelmed or tune you out. During Savasana it’s best to stop talking, unless you are doing a guided relaxation. Give them a chance to absorb and integrate. And if someone asks a question at the end of the class, it’s best to be brief and concise. I once observed a yoga teacher give a very lengthy answer to a student’s question and it looked almost comical – the student looked uncomfortable and was trying to get away while the teacher held on to her sleeve and kept on talking. It would be funny if it weren’t so sad.

Language is the most powerful tool for a yoga teacher. What we say to our students before, during and after the class matters. Keeping the language simple, clean and concise helps the student cultivate attention and create mental clarity.

Have you ever recorded yourself teaching? What was your impression? What other language mishaps did you observe in yourself and other teachers that we can all learn from?

Shoulderstand – to teach, or not to teach, that is the question

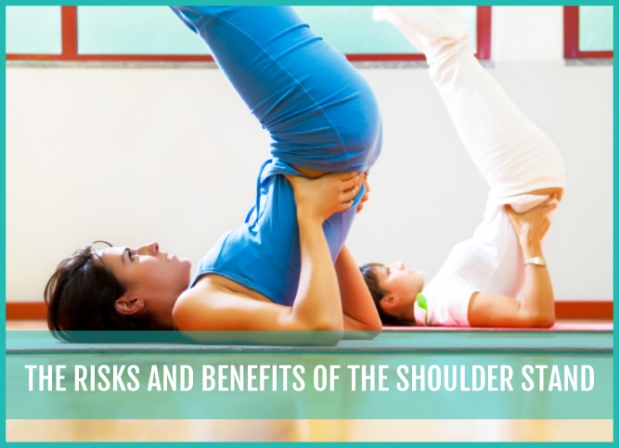
Many yoga teachers have had an experience of a student stepping into a class and immediately plopping up into a Shoulderstand (or a Headstand, which is even riskier). It always makes me wonder – is it a genuine way to prepare for class or an opportunity to show off? But regardless of the intention here, it’s a bad idea either way.  Why? Because the neck is at steak! Both inversions place a tremendous amount of stress on the neck, so it needs to be prepared and then compensated for adequately. And unfortunately, Plow is NOT a good preparation for the Shoulderstand and Fish pose is NOT the best compensation. But before we get into that, let me ask you: is Shoulderstand worth teaching at all?

Shoulderstand-Risk-And-Benefits

There seems to be two camps of yoga teachers when it comes to Shoulderstand: those who teach it all the time, and those who barely teach it at all. Those who teach it all the time talk about great benefits; those who don’t teach it much are mostly concerned with risks.  When talking about benefits, Shoulderstand is often assigned almost mythical qualities: increased lymph circulation, increased blood flow to the brain, relief from asthma, better hormonal balance, stress relief, better metabolism, fat loss (ha?), muscle toning, excellent both for insomnia and fatigue, etc. Unfortunately, nobody can site any studies for those claims, probably because there aren’t any (if you know some, please alert me!) There are a lot of assumptions here. We ASSUME, that if we increase circulation to the place where the thyroid gland is, it would improve it’s function. Yet gland is not a muscle, it doesn’t work the same way.  We ASSUME that if we are upside down that the blood flow to the brain is increased, but in fact there is a blood brain barrier that protects the brain from foreign substances and also maintains a constant environment for the brain. And fat loss? Come on, who would suggest that an overweight person flips upside down asking the neck to bear all that weight for the faint promise of increased metabolism?

On the other hand the risks of the Shoulderstand are very real. You are placing the neck in an extreme position, pulling strongly on the posterior structures of the neck, including nuchal ligament, which supports the weight of the head. Ligaments are not elastic, so once you overstretch it, it is not going to return to it’s original length, which compromises the support structure for your (heavy) head. Another very real risk of regular Shoulderstand practice is loosing the curve of the cervical spine, leading to potential disc compression. And to quote Michelle Edwards of Yoga Align: “What happens when you have a flat neck spine? You loose the shock absorbing forces; flat neck transfers force to the front of the vertebrae stimulating weight bearing surfaces to grow extra bone or spurs which can lead to pain, numbness and headaches.” Our necks are designed to be very mobile, which means not very stable, and support the weight of the head, not the entire body.

I guess by now you’ve guessed which teaching camp I belong to? 🙂 I rarely teach Shoulderstand and when I do, usually only to a group of capable students that I know very well.  Then the entire class is organized around it – we take time to prepare the body and then time to compensate, all with the purpose of minimizing the risk. Why do I teach it at all? Well, there are verifiable benefits. The main benefit, of course, is reversing the downward pull of gravity on our bodies. The gravitational force is constantly pulling us down which causes changes in our bodies that become more pronounced with age: loss of height, organ prolapse, varicose veins, etc. (Here is an interesting summary of those effects: https://www.evolutionhealth.com/Inversion_Therapy/Gravity_Inversion.html). To slow this process down you can either travel into space or invert your body. And Shoulderstand does just that (inverting, not space travel).

Astronaut

In addition, when you are upside down in a Shoulderstand

  • Your spinal musculature has to work in a different way, which leads to strengthening of those structures
  • Your entire body has to work together to maintain equilibrium, which means building better integration between different parts
  • Your diaphragm has to contract against gravity on the inhalation, which means strengthening of the respiratory musculature
  • It gives you a new perspective on things by literally turning your outlook on it’s head

It also helps you stretch your upper back muscles and usually has an energizing effect on the system.

Traditionally, Sarvangasana is called the Mother of all postures and is said to replenish the nectar of immortality that we all enter this world with. So, basically, if you practice Shoulderstand you will stay young forever 🙂 I can neither prove nor disprove this statement. But if you are interested in practicing Shoulderstand, check back for the second part of the post where we will go into details about what it takes to prepare your neck and the rest of the body for this pose and what is the best way to compensate for it.